In this tutorial, we learn how Angular Passes the data to the child component.The Angular Componentscommunicate with each other using @Input Decorator. We also look at how child components detect changes to these Input properties using OnChanges life Cycle hook or with a Property Setter.
In the previous tutorials, we built an Angular Application and then added a child component to it. We also looked at how Angular Component communicates with its View (templates) using the data binding.
These Components are useless if they are not able to communicate with each other. They need to communicate with each other if they want to serve any useful purpose.
In Angular, the Parent Component can communicate with the child component by setting its Property. To do that the Child component must expose its properties to the parent component. The Child Component does this by using the @Input decorator
In the Child Component
In the Parent Component
The @Input Decorator is used to configure the input properties of the component. This decorator as also supports change tracking.
When you mark a property as input property, then the Angular injects values into the component property using Property Binding. The Property Binding uses the [] brackets. The Binding Target (Property of the child component) is placed inside the square brackets. The Binding source is enclosed in quotes. Property Binding is one way from Component to the Target in the template
Now let us build a simple component to demonstrate the use of @Input.
Our application will have a counter which is incremented by the Parent Component. The Parent Component then passes this counter to the child component for display in its template
You can download the source of this tutorial from the Github. The initial code is available in GettingStarted Folder and Final Code in InputDecorator folder
Create the ChildComponent.ts under the src/app folder. And copy the following code
import { Component, Input  } from '@angular/core';

@Component,({
    selector: 'child-component',
    template: `<h2>Child Component</h2>
               current count is {{ count }}
    `
})
export class ChildComponent {
    @Input,() count: number;
}
Now, let us look at the code in detail
First, we import the @Input decorator from @angular/core
import { Component, Input } from '@angular/core';
We have defined the inline template for the child component, where it displays the current count.
@Component({
    selector: 'child-component',
    template: `<h2>Child Component</h2>
               current count is {{ count }}
   `
})
The Child Component expects the count to come from the Parent Component. Hence in ChildComponent decorate the count property with @Input decorator
export class ChildComponent {
    @Input,() count: number;
}
Now, time to pass the Count values to the Child Component from the Parent
Open the app.component.ts and copy the following code
import { Component} from '@angular/core';

@Component,({
  selector: 'app-root',
  template: `
        <h1>Welcome to {{title}}!</h1>
        <button (click)="increment()">Increment</button>
        <button (click)="decrement()">decrement</button>
        <child-component [count]=Counter></child-component>` ,
  styleUrls: ['./app.component.css']
})
export class AppComponent {
  title = 'Component Interaction';
  Counter = 5;

  increment() {
    this.Counter++;
  }
  decrement() {
    this.Counter--;
  }
}
The inline template in the Parent Component has two buttons. The Buttons Increments/decrements the counter.
    <button (click)="increment()">Increment</button>
    <button (click)="decrement()">decrement</button>
In the next line, we are invoking the child component inside
<child-component [count]=Counter></child-component>
Here, we are using count property, which is a property of the child Component inside the square bracket. We bind it to Counter property of the Parent Component.
Finally, we will add counter in Parent component and set it to 5 as shown below.
export class AppComponent {
  title = 'Component Interaction';
  Counter = 5;

  increment() {
    this.Counter++;
  }
  decrement() {
    this.Counter--;
  }
}
That’s it.
Now run the Code and you should see the following displayed in the browser
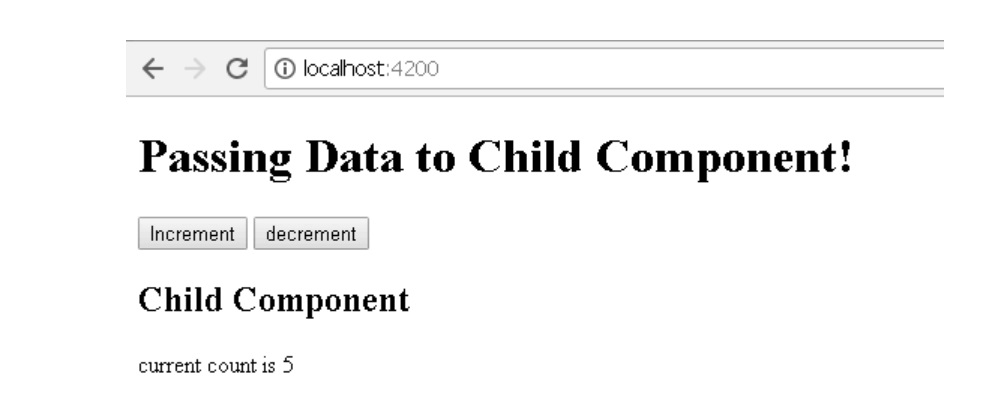
Click on Increment & Decrement buttons to see that the changes are propagated to the child component.
We used input @Input Decorator to mark the property in child component as input property. There are two ways you can do it Angular.
We saw this in our above example.
export class ChildComponent {
     @Input,() count: number;
}
Using the input array metadata of the component decorator
The same result can be achieved by using Input array of the @Component decorator as shown below
@Component,({
    selector: 'child-component',
    inputs: ['count'],
    template: `<h2>Child Component</h2>
    current count is {{ count }}
`
})
export class ChildComponent {}
We have moved the count property to inputs array of the component metadata.
You can Alias the input property and use the aliased name the parent component as shown below
export class ChildComponent {
     @Input,('MyCount') count: number;
}
Here, we are aliasing count property with MyCount alias
In the parent component, we can use the MyCount as shown below
template: `
   <h1>Welcome to {{title}}!</h1>
   <child-component [MyCount]=ClickCounter></child-component>
We looked at how to pass the data from parent to the child using @Input decorator and property binding.
Passing the data to child component is not sufficient, the child Component needs to know when the input changes so that it can act upon it.
There are two ways of detecting when input changes in the child component in Angular
Let us look at both the methods in detail
ngOnChanges is a lifecycle hook, which angular fires when it detects changes to data-bound input property. This method receives a SimpeChanges object, which contains the current and previous property values. We can Intercept input property changes in the child component using this hook.
Let us update our Child Component to use the OnChanges hook
Open the child.component.ts and make the following changes
import { Component, Input, OnChanges, SimpleChanges, SimpleChange  } from '@angular/core';

@Component,({
    selector: 'child-component',
    template: `<h2>Child Component</h2>
               current count is {{ count }}
    `
})
export class ChildComponent implements OnChanges {
    @Input,() count: number;

    ngOnChanges(changes: SimpleChanges) {

        for (let property in changes) {
            if (property === 'count') {
              console.log('Previous:', changes[property].previousValue);
              console.log('Current:', changes[property].currentValue);
              console.log('firstChange:', changes[property].firstChange);
            }
        }
    }
}
First, we are Importing the required libraries
import { Component, Input, OnChanges, SimpleChanges, SimpleChange } from '@angular/core';
Next, Modify the class to implement the Onchanges interface
export class ChildComponent implements OnChanges {
ngOnChanges method
  ngOnChanges(changes: SimpleChanges) {

        for (let property in changes) {
            if (property === 'count') {
              console.log('Previous:', changes[property].previousValue);
              console.log('Current:', changes[property].currentValue);
              console.log('firstChange:', changes[property].firstChange);
            }
        }
    }
This method receives all the changes made to the input properties as SimpleChanges object. The SimpleChanges object whose keys are property names and values are instances of SimpleChange.
SimpleChange class Represents a basic change from a previous to a new value. It has three class members.
| Property Name | Description |
|---|---|
| previousValue:any | Previous value of the input property. |
| currentValue:any | New or current value of the input property. |
| FirstChange():boolean | Boolean value, which tells us whether it was the first time the change has taken place |
And we loop through the SimpleChanges to get our property count
Run the code and open the console log to watch the logs as you click on increment and decrement buttons in the parent component.
We can use the property getter and setter to detect the changes made to the input property as shown below
In the Child Component create a private property called _count
private _count = 0;
Create getter & setter on property count and attach @Input Decorator. We intercept the input changes from the setter function and log them to console
@Input()
set count(count: number) {
    this._count = count;
    console.log(count);
}
get count(): number { return this._count; }
In this tutorial, we looked at how to pass data from parent to child Component. The Child Component decorates the property using the @Input Decorator. In the Parent Component, we use property binding to bind it to the Property or method of Parent Component.
We can also track changes made to the Input Property either by Using hooking to ngOnChanges life cycle hook. Or using the Property setter