ANGULAR
Complete Angular Tutorial For Beginners Introduction to Angular | What is Angular? Architecture Overview & Concepts of Angular How to Install Angular How to Create a new project in Angular Bootstrapping in Angular: How It Works Internally Angular Components Overview & Examples Data Binding in Angular Interpolation in Angular Property Binding in Angular Event Binding in Angular ngModel & Two way Data binding in Angular NgModelChange & Change Event in Angular Child/Nested Components in Angular angular directives angular ngFor directive ngSwitch, ngSwitchcase, ngSwitchDefa ult Angular Example How to use ngIf, else, then in Angular By example NgClass Example Conditionally apply class Angular ngStyle Directive Angular Trackby to improve ngFor Performance How to Create & Use Custom Directive In Angular Working with Angular Pipes How to Create Custom Pipe in Angular Formatting Dates with Angular Date Pipe Using Angular Async Pipe with ngIf & ngFor angular keyValue pipe Using Angular Pipes in Components or Services Angular Component Communication & Sharing Data Angular Pass data to child component Angular Pass data from Child to parent component Component Life Cycle Hooks in Angular Angular ngOnInit And ngOnDestroy Life Cycle hook Angular ngOnChanges life Cycle Hook Angular ngDoCheck Life Cycle Hook Angular Forms Tutorial: Fundamentals & Concep t s Angular Template-driven forms example How to set value in template-driven forms in Angular Angular Reactive Forms Example Using Angular FormBuilder to build Forms SetValue & PatchValue in Angular StatusChanges in Angular Forms ValueChanges in Angular Forms FormControl in Angular FormGroup in Angular Angular FormArray Example Nested FormArray Example Add Form Fields Dynamically SetValue & PatchValue in FormArray Angular Select Options Example in Angular Introduction to Angular Services Introduction to Angular Dependency Injection Angular Injector, @Injectable & @Inject Angular Providers: useClass, useValue, useFactory & useExisting Injection Token in Angular How Dependency Injection & Resolution Works in Angular Angular Singleton Service ProvidedIn root, any & platform in Angular @Self, @SkipSelf & @Optional Decorators Angular '@Host Decorator in Angular ViewProviders in Angular Angular Reactive Forms Validation Custom Validator in Angular Reactive Form Custom Validator with Parameters in Angular Inject Service Into Validator in Angular template_driven_form_validation_in_angular Custom Validator in Template Driven Forms in Angular Angular Async Validator Example Cross Field or Multi Field Validation Angular How to add Validators Dynamically using SetValidators in Angular Angular HttpClient Tutorial & Example Angular HTTP GET Example using httpclient Angular HTTP POST Example URL Parameters, Query Parameters, httpparams in Angular HttpClient Angular HTTPHeaders Example Understanding HTTP Interceptors in Angular Angular Routing Tutorial with Example Location Strategy in Angular Angular Route Params Angular : Child Routes / Nested Route Query Parameters in Angular Angular Pass Data to Route: Dynamic/Static RouterLink, Navigate & NavigateByUrl to Navigate Routes RouterLinkActive in Angular Angular Router Events ActivatedRoute in Angular Angular Guards Tutorial Angular CanActivate Guard Example Angular CanActivateChild Example Angular CanDeactivate Guard Angular Resolve Guard Introduction to Angular Modules or ngModule Angular Routing between modules Angular Folder Structure Best Practices Guide to Lazy loading in Angular Angular Preloading Strategy Angular CanLoad Guard Example Ng-Content & Content Projection in Angular Angular @input, @output & EventEmitter Template Reference Variable in Angular ng-container in Angular How to use ng-template & TemplateRef in Angular How to Use ngTemplateOutlet in Angular '@Hostbinding and @Hostlistener_in_Angular Understanding ViewChild, ViewChildren &erylist in Angular ElementRef in Angular Renderer2 Example: Manipulating DOM in Angular ContentChild and ContentChildren in Angular AfterViewInit, AfterViewChecked, AfterContentInit & AfterContentChecked in Angular Angular Decorators Observable in Angular using RxJs Create observable from a string, array & object in angular Create Observable from Event using FromEvent in Angular Using Angular observable pipe with example Angular Map Operator: Usage and Examples Filter Operator in Angular Observable Tap operator in Angular observable Using SwitchMap in Angular Using MergeMap in Angular Using concatMap in Angular Using ExhaustMap in Angular Take, TakeUntil, TakeWhile & TakeLast in Angular Observable First, Last & Single Operator in Angular Observable Skip, SkipUntil, SkipWhile & SkipLast Operators in Angular The Scan & Reduce operators in Angular DebounceTime & Debounce in Angular Delay & DelayWhen in Angular Using ThrowError in Angular Observable Using Catcherror Operator in Angular Observable ReTryWhen inReTry, ReTryWhen in Angular Observable Unsubscribing from an Observable in Angular Subjects in Angular ReplaySubject, BehaviorSubject & AsyncSubject in Angular Angular Observable Subject Example Sharing Data Between Components Angular Global CSS styles View Encapsulation in Angular Style binding in Angular Class Binding in Angular Angular Component Styles How to Install & Use Angular FontAwesome How to Add Bootstrap to Angular Angular Location Service: go/back/forward Angular How to use APP_INITIALIZER Angular Runtime Configuration Angular Environment Variables Error Handling in Angular Applications Angular HTTP Error Handling Angular CLI tutorial ng new in Angular CLI How to update Angular to latest version Migrate to Standalone Components in Angular Create Multiple Angular Apps in One Project Set Page Title Using Title Service Angular Example Dynamic Page Title based on Route in Angular Meta service in Angular. Add/Update Meta Tags Example Dynamic Meta Tags in Angular Angular Canonical URL Lazy Load Images in Angular Server Side Rendering Using Angular Universal The requested URL was not found on this server error in Angular Angular Examples & Sample Projects Best Resources to Learn Angular Best Angular Books in 2020

How to Create Custom Pipe in Angular

In this tutorial, we will show you how to create an Angular Custom Pipe. The Pipes are a great way to transform the appearance of elements in the template. The Angular comes with some great built-in pipes like Date pipe, Currency pipe, and Number pipe, etc. But if these pipes do not cover your needs, then we can create our own pipe in Angular.

To create a custom pipe, first we need to create a pipe class. The pipe class must implement the PipeTransform interface. We also decorate it with @pipe decorator. Give a name to the pipe under name metadata of the @pipe decorator. Finally, we create the transform method, which transforms given value to the desired output.

How to Create Custom Pipes

To create a Custom Pipe, first, You need to follow these steps

  1. Create a pipe class
  2. Decorate the class with @pipe decorator.
  3. Give a name to the pipe in the name meta data of the @pipe decorator. We will use this name in the template.
  4. The pipe class must implement the PipeTransform interface. The interfaces contain only one method transform.
  5. The first parameter to the transform method is the value to be transferred. The transform method must transform the value and return the result. You can add any number of additional arguments to the transform method.
  6. Declare the pipe class in the Angular Module (app.module.ts)
  7. Use the custom pipe just as you use other pipes.

Now let us create a Temperature converter pipe, which converts temperature from Celsius to Fahrenheit and vice versa.

Temparature Convertor Custom Pipe Example

Create a new Angular application. If you are new to Angular you can refer to the tutorial Create Angular Application.

We are using bootstrap 4 for styling. Hence open the index.html and add the following


<link rel="stylesheet" href="https://maxcdn.bootstrapcdn.com/bootstrap/4.0.0/css/bootstrap.min.css" integrity="sha384-Gn5384xqQ1aoWXA+058RXPxPg6fy4IWvTNh0E263XmFcJlSAwiGgFAW/dAiS6JXm" crossorigin="anonymous">


Create a new file temp-convertor.pipe.ts. Under the folder src/app. Copy the following code and paste it.


import {Pipe, PipeTransform} from '@angular/core';
 
@pipe({
    name: 'tempConverter'
})
export class TempConverterPipe implements PipeTransform {
    transform(value: number, unit: string) {
        if(value && !isNaN(value)) {
            if (unit === 'C') {
                var temperature = (value - 32) /1.8 ;
                return temperature.toFixed(2);
            } else if (unit === 'F'){
                var temperature = (value * 1.8 ) + 32
                return temperature.toFixed(2);
            }
        }
        return;
    }
}


Let us look at the code in details

We need to import the Pipe & PipeTransform libraries from Angular. These libraries are part of the Angular Core

                              
import {Pipe, PipeTransform} from '@angular/core';


We decorate TempConverterPipe class with @pipe decorator. The @pipe decorator is what tells Angular that the class is a pipe. the decorator expects us to provide a name to the pipe. We have given it as tempConverter. This is the name we must use in the template to make use of this pipe.

Our class must implement the PipeTransform interface.


@pipe({
    name: 'tempConverter'
})
export class TempConverterPipe implements PipeTransform {
 
 
}


The PipeTransform interface defines only one method transform. The interface definition is as follows.


interface PipeTransform {
  transform(value: any, ...args: any[]): any
}


The first argument value is the value, that pipe needs to transform. We can also include any number of arguments. The method must return the final transformed data.

The following is Our implementation of the transform method. The first is Value and the second is the Unit. The unit expects either C (Convert to Celsius) or F ( convert to Fahrenheit). It converts the value received to either to Celsius or to Fahrenheit based on the Unit.


export class TempConverterPipe implements PipeTransform {
 
    transform(value: number, unit: string) {
        if(value && !isNaN(value)) {
            if (unit === 'C') {
               var temperature = (value - 32) /1.8 ;
               return temperature.toFixed(2);
            } else if (unit === 'F'){
               var temperature = (value * 1.8 ) + 32
               return temperature.toFixed(2);
            }
        }
        return;
    }
 
}


Declare the Pipe

Before using our pipe, we need to tell our component, where to find it. This is done by first by importing it and then including it in declarations array of the AppModule.


import { BrowserModule } from '@angular/platform-browser';
import { NgModule } from '@angular/core';
import { FormsModule } from '@angular/forms';
import { HttpModule } from '@angular/http';
 
import { AppComponent } from './app.component';
 
import {TempConverterPipe} from './temp-convertor.pipe';
 
@NgModule({
    declarations: [AppComponent,TempConverterPipe],
    imports: [BrowserModule,FormsModule,HttpModule],
    bootstrap: [AppComponent]
})
export class AppModule { }


Using the Custom Pipe

The custom pipes are used in the same as the Angular built-in pipes are used. Add the following HTML code to your app.component.html file


<div class='card'>
  <div class='card-header'>
    <p>{{title}} </p>
  </div>
  <div class="card-body">
 
    <div class="row">
      <h3>Fahrenheit to Celsius </h3>
    </div>
    <div class="row">
      <p> Fahrenheit : <input type="text" [(ngModel)]="Fahrenheit" /> 
      Celsius : {{Fahrenheit | tempConverter:'C'}} </p>
    </div>
 
    <div class="row">
      <h3>Celsius to Fahrenheit </h3>
    </div>
    <div class="row">
      <p> celsius : <input type="text" [(ngModel)]="celcius" /> 
       Fahrenheit : {{celcius | tempConverter:'F'}} </p>
    </div>
  </div>
</div>


We use our pipe as follows. Fahrenheit is sent to the tempConverter as the first argument value. We use the | to indicate that the tempConverter is a pipe to angular. The C after the colon is the first argument. You can pass more than argument to the pipe by separating each argument by a : colon.


{{Fahrenheit | tempConverter:'C'}}
                            
                        
image

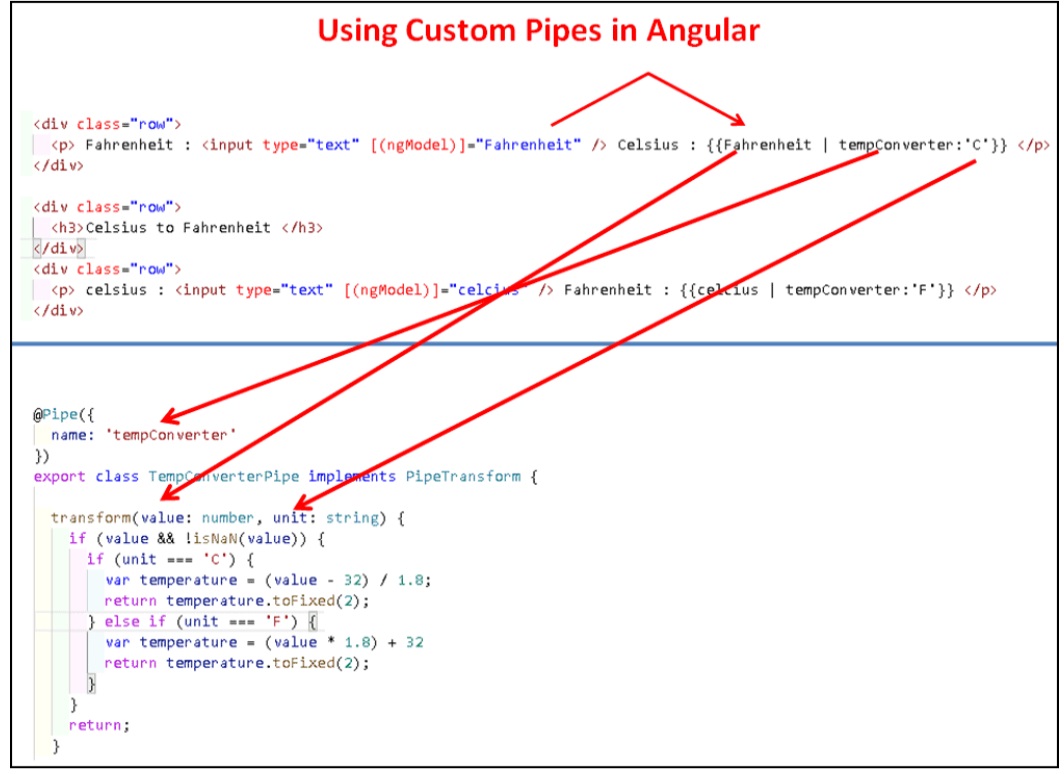
Using the TempConverter Pipe in Template

app.component code
                              

import { Component } from '@angular/core';
import { FormsModule } from '@angular/forms';
 
 
@Component({
  selector: 'app-root',
  templateUrl: './app.component.html',
  styleUrls: ['./app.component.css']
})
 
 
export class AppComponent
{
    title: string = 'Angular Custom Pipe Example' ;
    celcius: number;
    Fahrenheit: number;   
}


Run the application and test it.

image