In this guide let us explore how to use ng-content to add external content (content projection) in the Template. We know how to use @Input decorator to pass data from the parent component to the child component. But it is only limited to data. We cannot use that technique to pass the content which includes the HTML elements, CSS, etc to the child component. To do that we have to make use of content projection.
Content projection is a way to pass the HTML content from the parent component to the child component. The child component will display the template in a designated spot. We use the ng-content element to designate a spot in the template of the child component. The ng-content also allows us to create multiple slots using the selector attribute. The parent can send different content to each slot.
The ng-content tag acts as a placeholder for inserting external or dynamic content. The Parent component passes the external content to the child component. When Angular parses the template, it inserts the external content where ng-content appears in the child component’s template
We can use content projection to create a reusable component. The components that have similar logic & layout and can be used in many places in the application.
Take an example of a card component. It has a header section,footer section & body section. The contents of these sections will vary. The ng-content will allow us to pass these sections to the card component from the parent component. This enables us to use the card component at many places in the app.
To understand how content projection using ng-content works, first let us build a simple button component without ng-content.
Create a new Angular application. Add a new component btn.component.ts.It is a simple component, which displays a button with the caption Click Me
import { Component } from '@angular/core';

@Component({
 selector: 'app-btn',
 template: `<button>
       Click Me
     </button>`
})
export class BtnComponent {
}
Now go to the app.component.html.
<h2>Simple Button Demo</h2>
<app-btn></app-btn>
<app-btn></app-btn>
In the code above, we have two buttons with the caption Click Me show up on the screen as expected.
What if we want to change the caption from the parent. We can do that using the @Input property. But using @input, we can only set the caption of the button. But we cannot change the look and appearance of the caption.
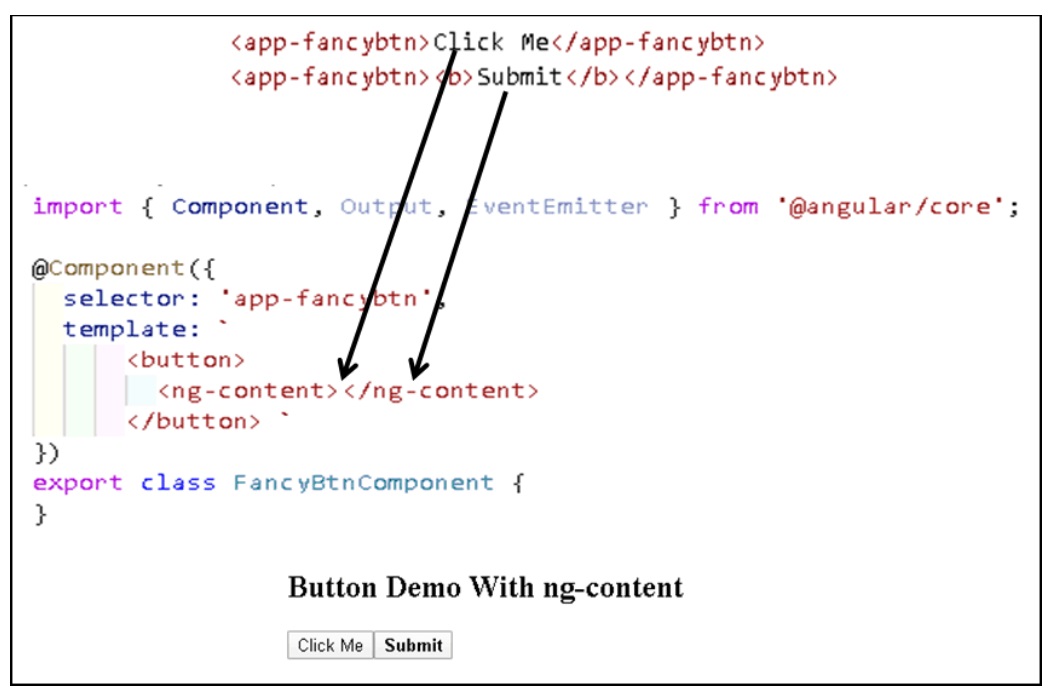
Create a new component FancyBtnComponent. Copy all the codes from BtnComponent except for one change. Remove Click Me and add <ng-content> </ng-content> instead. This tag acts as a placeholder. You can also think of it as an argument to the component. The parent component must supply the argument
import { Component, Output, EventEmitter } from '@angular/core';

@Component({
 selector: 'app-fancybtn',
 template: `
     <button>
       <ng-content></ng-content>
     </button> `
})
export class FancyBtnComponent {
}
Now open the app.component.html
<h2>Button Demo With ng-content</h2>
<app-fancybtn>Click Me</app-fancybtn>
<app-fancybtn><b>Submit</b></app-fancybtn>
The content between a <pp-fancybtn> </app-fancybtn> is passed to our FancyBtnComponent. The component displays it in place of ng-content.
The advantage of such a solution is that you can pass any HTML content.
The events like click,input, etc bubble up. Hence can be captured in the parent as shown below
**app.component.html**

<h2>Button with click event</h2>
<app-fancybtn (click)="btnClicked($event)"><b>Submit</b></app-fancybtn>


** App.component.ts ***

 btnClicked($event) {
   console.log($event)
   alert('button clicked')
 }
But if you have more than one button, then you may have to inspect the $event argument to check, which button responsible for the event.
You can create custom events using the @output as shown in below
@Output,() someEvent:EventEmitter =new EventEmitter();

raiseSomeEvent() {
 this.someEvent.emit(args);
}
In parent component
<app-fancybtn (someEvent)=”DoSomething($event)”><b>Submit</b></app-fancybtn>
The button example is a very simple example. The ng-content is much more powerful than that. It allows us to create multiple slots in the template. Each slot must define a selector. You can think this as a multiple arguments to the component
In the parent component we can create different contents and each of those contents can be projected into any of those slots depending on their selector. To implement this we make use of the ng-content Select attribute. The select attribute is a CSS Selector
For Example, create a new component card.component.ts
import { Component } from '@angular/core';


@Component,({
  selector: 'app-card',
  template: `
    <div class="card">
    <div class="header">
      <ng-content select="header" ></ng-content>
    </div>
    <div class="content">
      <ng-content select="content" ></ng-content>
    </div>
    <div class="footer">
      <ng-content select="footer" ></ng-content>
    </div>
    </div>
  `,
  styles: [
    ` .card { min- width: 280px;  margin: 5px;  float:left  }
      .header { color: blue}
    `
  ]
})
export class CardComponent {
}
In the above example, we have three ng-content slots, each have a selector header, content & footer
Now open the app.component.html add the following code
<app-card>
 <header><h1>Angular</h1></header>
 <content>One framework. Mobile & desktop.</content>
 <footer><b>Super-powered by Google </b></footer>
</app-card>

<app-card>
 <header><h1 style="color:red;">React</h1></header>
 <content>A JavaScript library for building user interfaces</content>
 <footer><b>Facebook Open Source </b></footer>
</app-card>
You can use any CSS selector as the select attribute. Like class, element, id attributes, etc. For Example, the above card component using the CSS class
Now open the app.component.html add the following code
import { Component } from '@angular/core';

@Component,({
  selector: 'card',
  template: `
    <div class="card">
    <div class="header">
      <ng-content select=".header" ></ng-content>
    </div>
    <div class="content">
      <ng-content select=".content" ></ng-content>
    </div>
    <div class="footer">
      <ng-content select=".footer" ></ng-content>
    </div>
    </div>
  `,
  styles: [
    ` .card { width: 280px;  margin: 5px;  float:left; border-width:1px; border-style:solid ; }
      .header { color: blue}
    `
  ]
})
export class CardComponent {
And in the component, we use it as
<card>
  <div class="header">
    <h1>Angular</h1>
  </div>
  <div class="content">One framework. Mobile & desktop.</div>
  <div class="footer"><b>Super-powered by Google </b></div>
</card>

<card>
  <div class="header">
    <h1 style="color:red;">React</h1>
  </div>
  <div class="content">A JavaScript library for building user interfaces</div>
  <div class="footer"><b>Facebook Open Source </b></div>
</card>
Similarly, you can use the various CSS Selectors as shown below
 <ng-content select="custom-element" ></ng-content>
 <ng-content select=".custom-class" ></ng-content>
 <ng-content select="[custom-attribute]" ></ng-content>
Now, in the following example, the last paragraph does not belong to any ng-content slots. Hence ng-content will not project the last para as it cannot determine where to add.
<card>
  <div class="header"><h1>Typescript</h1></div>
  <div class="content">Typescript is a javascript for any scale</div>
  <div class="footer"><b>Microsoft </b></div>
  <p>This text will not be shown</p>
</card>
To solve the above issue, we can include ng-content without any selector. It will display all the content, which cannot be projected into any other slots.
import { Component } from '@angular/core';


@Component,({
  selector: 'app-card',
  template: `
    <div class="card">
    <div class="header">
      <ng-content select="header" ></ng-content>
    </div>
    <div class="content">
      <ng-content select="content" ></ng-content>
    </div>
    <div class="footer">
      <ng-content select="footer" ></ng-content>
    </div>
    <ng-content></ng-content>
    </div>
  `,
  styles: [
    ` .card { min- width: 280px;  margin: 5px;  float:left  }
      .header { color: blue}
    `
  ]
})
export class CardComponent {
}
Sometimes it becomes necessary to wrap the component using the ng-container. Most of the time when you use a structural directive like ngIf or ngSwitch.
In the following example, we enclosed the header inside the ng-container.
<card>
  <ng-container>
    <div class="header">
      <h1 style="color:red;">React</h1>
    </div>
  </ng-container>
  <div class="content">A JavaScript library for building user interfaces</div>
  <div class="footer"><b>Facebook Open Source </b></div>
</card>
Because of the ng-container, the header section is not projected to the header slot. Instead, it is projected to the ng-content slot which does not have a selector set.
To help in such a scenario, you can make use of ngProjectAs attribute as shown below.
<card>
  <ng-container ngProjectAs="header">
    <div>
      <h1 style="color:red;">React</h1>
    </div>
  </ng-container>
  <div class="content">A JavaScript library for building user interfaces</div>
  <div class="footer"><b>Facebook Open Source </b></div>
</card>
The ng-content allows us to add the external content in the Template. Unlike @Input, using ng-content we can pass the data which includes the HTML elements, CSS, etc, This is also known as content projection. We can also define different slots using the selector attribute. These slots allow us to add different content to different slots.