View Encapsulation in Angular defines how the styles defined in the template affect the other parts of the application. The angular uses three strategies while rendering the view ViewEncapsulation.Emulated, ViewEncapsulation.ShadowDOM and ViewEncapsulation.None This article describes what is View Encapsulation using an example and how it is implemented in angular. We also learn what is shadow dom in Angular.
Angular allows us the specify component-specific styles. This is done by specifying either inline-style styles: or using the external style sheet styleUrls: in the @Component decorator or @directive decorator.
Example of External Style sheet
@Component({
  selector: 'app-root',
  templateUrl: './app.component.html',
  styleUrls: ['./app.component.css']
})
@Component({
  selector: 'app-root',
  templateUrl: './app.component.html',
  styles: ['p { color:blue}'],
})
The CSS Styles have global scope. CSS rules apply to the entire document. You cannot apply rules to the part of the document. Hence, we use class, id & CSS specificity rules to ensure that the styles do not interfere with each other
In the case of Angular apps, the components co-exist with the other components. Hence it becomes very important to ensure that the CSS Styles specified in one component do not override the rules in another component.
Angular does this by using the View Encapsulation strategies
One of the fundamental concepts in object-oriented programming (OOP) is Encapsulation. It defines the idea that all the data and methods that operate on that data are kept private in a single unit (or class). It is like hiding the implementation detail from the outside world. The consumer of encapsulated object know that it works but does not know how it works.
The View Encapsulation in Angular is a strategy that determines how angular hides (encapsulates) the styles defined in the component from bleeding over to the other parts of the application.
The following three strategies are provided by Angular to determine how styles are applied.
The viewEncapsulation Native is deprecated since
Angular version 6.0.8, and is replaced by
viewEncapsulation ShadowDom
The Encapsulation methods are added using the encapsulation metadata of the @Component decorator as shown below
@Component({
  template: `<p>Using Emulator</p>`,
  styles: ['p { color:red}'],
  encapsulation: ViewEncapsulation.Emulated     //This is default
//encapsulation: ViewEncapsulation.None
//encapsulation: ViewEncapsulation.ShadowDOM
})
ViewEncapsulation.Emulated is the default encapsulation
method.
Create an angular application using the
app.component.ts
import { Component } from '@angular/core';

@Component({
  selector: 'app-root',
  templateUrl: './app.component.html',
  styleUrls: ['./app.component.css']
})
export class AppComponent {
  title = 'View Encapsulation in Angular';
}
Open the app.component.html
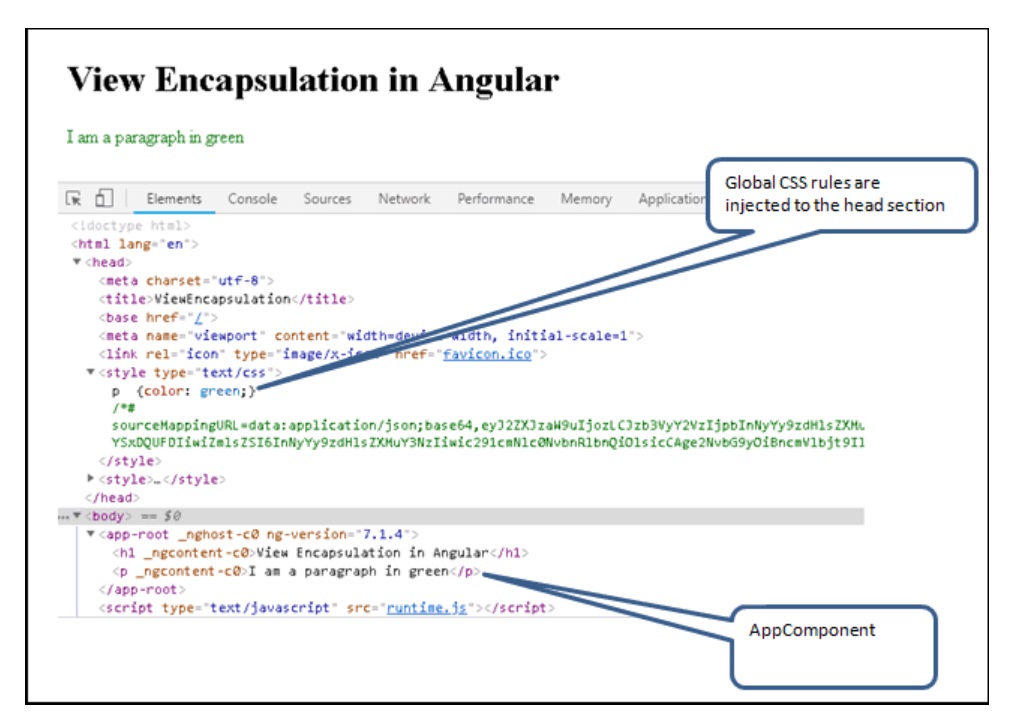
<h1>{{title}}</h1>
<p>I am a paragraph in green</p>
open the src/styles.css and the following CSS
p {color: green;}
Run the app and you should able to see the paragraph in green.
Open the chrome developer tools and check the elements section. The CSS rules are inserted in the head section of the page
The ViewEncapsulation.None is used, when we do not want any encapsulation. When you use this, the styles defined in one component affect the elements of the other components.
Now, let us look at ViewEncapsulation.None does.
Create a new component ViewNoneComponent and add the following code.
import { Component,ViewEncapsulation } from '@angular/core';
@Component({
selector: 'app-none',
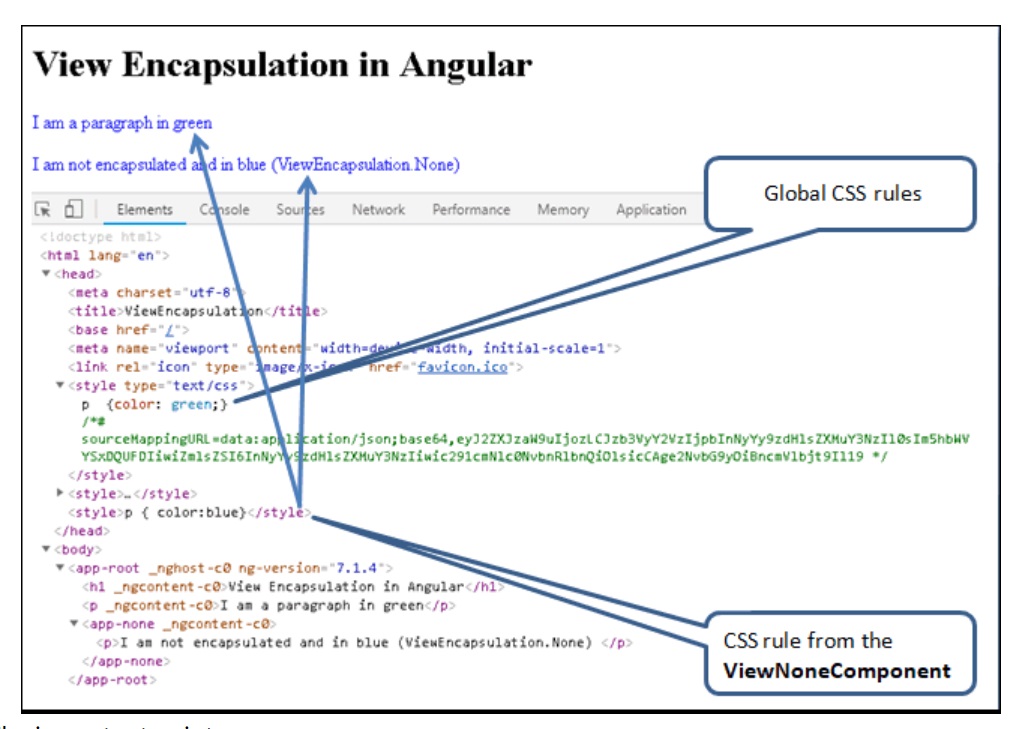
template: `<p>I am not encapsulated and in blue
(ViewEncapsulation.None) </p>`,
styles: ['p { color:blue}'],
encapsulation: ViewEncapsulation.None
})
export class ViewNoneComponent {
}
We have added encapsulation: ViewEncapsulation.None. We have also defined the inline style p { color:blue}.
Do not forget to import & declare the component in AppModule. You also need to add the <input> <app-none> <app-none> selector in app.component.html
<h1>{{title}}</h1>
<p>I am a paragraph in green</p>

<app-none></app-none>
Run the code and as expected both the paragraphs turn blue.
That is because of the global scope of CSS styles. The style defined in the ViewNoneComponent is injected into the global style and overrides any previously defined style. The style p {color: blue;} overrides the style p {color: green;} defined in the styles.css.
The important points are
In an HTML page, we can easily add a id or a class to the element to increase the specificity of the CSS rules so that the CSS rules do not interfere with each other.
The ViewEncapsulation.Emulated strategy in angular adds the unique HTML attributes to the component CSS styles and to the markup so as to achieve encapsulation. This is not true encapsulation. The Angular Emulates the encapsulation, Hence the name Emulated.
If you do not specify encapsulations in components, the angular uses the
ViewEncapsulation.Emulated strategy
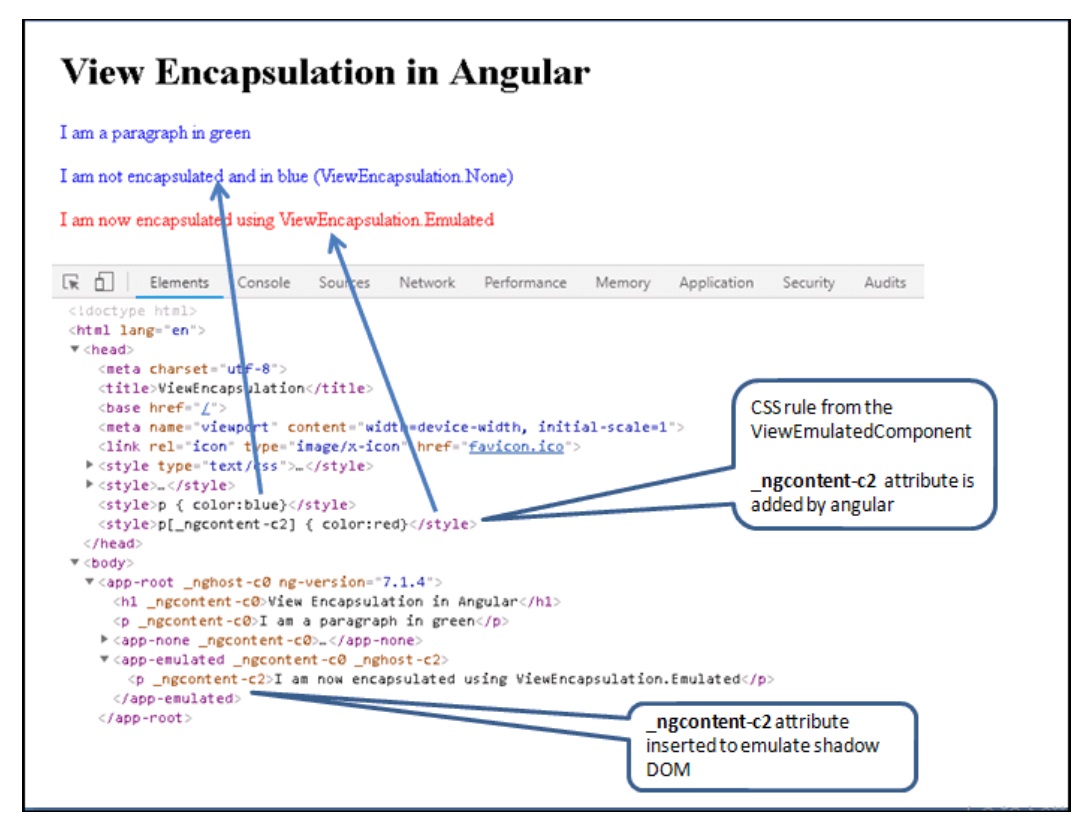
Create a new component in the Angular app and name it as ViewEmulatedComponent. as shown below
import { Component,ViewEncapsulation } from '@angular/core';

@Component({
  selector: 'app-emulated',
  template: `<p>Using Emulator</p>`,
  styles: ['p { color:red}'],
  encapsulation: ViewEncapsulation.Emulated
})
export class ViewEmulatedComponent {
}
We have not added any id in the above component. The only change this component has with one ViewNoneComponent was encapsulation mode, which is set to ViewEncapsulation.Emulated
Update app.component.html
<h1>{{title}}</h1>

<p>I am a paragraph in green</p>

<app-none></app-none>

<app-emulated></app-emulated>
Now, you can see that the style does not spill out to other components when you use emulated mode. i.e because angular adds _ngcontent-c# attributes to the emulated components and makes necessary changes in the generated styles
You can see this by opening the chrome developer console
_ngcontent-c2 attribute is added to the style and to the p element, making the style local to the component
<style>p[_ngcontent-c2] { color:red}</style>
<app-emulated _ngcontent-c0 _nghost-c2>
    <p _ngcontent-c2>Using Emulator</p>
</app-emulated>
The important points are
The Shadow DOM is a scoped sub-tree of the DOM. It is attached to an element (called shadow host) of the DOM tree. The shadow dom does not appear as a child node of the shadow host when you traverse the main DOM.
The browser keeps the shadow DOM separate from the main DOM. The rendering of the Shadow dom and the main DOM happens separately. The browser flattens them together before displaying them to the user. The feature, state & style of the Shadow DOM stays private and are not affected by the main DOM. Hence it achieves true encapsulation.
The Shadow DOM is part of the Web Components standard. Not all browsers
support shadow dom. Use google chrome for the following examples
Further Reading on Shadow DOM
To create shadow dom in angular , all we need to do is to add the ViewEncapsulation.ShadowDom as the encapsulation strategy.
Create a new component ViewShadowdomComponent and add the following code
iimport { Component,ViewEncapsulation } from '@angular/core';

@Component({
  selector: 'app-shadowdom',
  template: `<p>I am encapsulated inside a Shadow DOM ViewEncapsulation.ShadowDom</p>`,
  styles: ['p { color:brown}'],
  encapsulation: ViewEncapsulation.ShadowDom
})
export class ViewShadowdomComponent {

}
The component renders as follows
The angular renders the component inside the #shadow root element. The styles from the component along with the styles from the parent and other components are also injected inside the shadow root
The app-shadowdom is the CSS selector in the ViewShadowdomComponent. We used it in our app-component.html. The Angular renders component as shadow dom and attaches it to the app-shadowdom selector. Hence, we call the element as Shadow host
The Shadow DOM starts from #shadow-root element. Hence, we call
this element as shadow
root. The Angular injects the
component into the shadow root.
The Shadow boundary starts from the #shadow-root. The browser encapsulates everything inside this element including the node #shadow-root
The shadow dom archives the true encapsulation. It truly isolates the component from the styles from the other parts of the app.
The styles from the parent component & sibling components are still injected into the shadow dom. but that is an angular feature. The angular wants the component to share the parent & sibling styles. Without this the component may look out of place with the other component
The important points are
We learned what view encapsulation is and how to make use of the three different view encapsulation strategies. i.e. None, Emulated & ShadowDOM. In the next tutorial, we shall look into how to style an Angular Component.